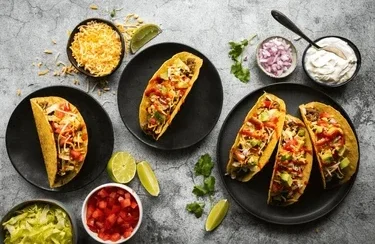
Food

Veggie Tacos

Tacos are a loved Mexican dish loved worldwide for his or her scrumptious flavors and flexibility. The history of tacos is as wealthy as their taste, with roots tracing returned to indigenous Mesoamerican cultures, specially the Aztecs. Origin Story : Tacos have a rich and diverse history that spans centuries and continents. The story of tacos begins in pre-Columbian times in Mesoamerica, particularly in what is now modern-day Mexico. The indigenous peoples of this region, such as the Aztecs, Mayans, and other ancient civilizations, are credited with developing the early forms of tacos. The word “taco” itself is assumed to have originated from the Nahuatl language spoken with the aid of the Aztecs. The term “tlahco,” meaning “half” or “in the middle,” was used to describe the way food was placed in the middle of tortillas. Over time, this evolved into what we now know as tacos. Initially, tacos were a simple yet ingenious way to wrap and consume food. The indigenous people of Mesoamerica used maize (corn) as a staple crop, and they would grind it to make dough for tortillas. These tortillas were then used to wrap various fillings, which could include fish, beans, vegetables, and meats. With the arrival of Spanish conquistadors in the 16th century, Old World ingredients like pork, chicken, beef, and cheese were introduced to the Americas. This further diversified the fillings used in tacos, leading to the creation of various regional and cultural variations. The popularity of tacos grew over time, especially in Mexico. They were initially considered street food and were sold in markets, by vendors, and in humble eateries. However, as Mexican cuisine gained international recognition, tacos became a symbol of Mexican culinary identity. In the 20th century, Mexican immigrants brought tacos to the United States, where they gained immense popularity, particularly in states with large Hispanic populations such as California and Texas. The adaptation of tacos in the U.S. led to the creation of new styles and flavors, including the now-iconic crunchy taco shell. Today, tacos are enjoyed worldwide, with countless variations and interpretations. From traditional street tacos found in Mexico City to gourmet fusion tacos served in upscale restaurants, tacos continue to evolve and captivate food enthusiasts everywhere. Ingredients 8-10 corn or flour tortillas 1 can (15 oz) of black beans, tired and rinsed 1 red bell pepper, diced 1 green bell pepper, diced 1 onion, diced 1 cup corn kernels (fresh, canned, or frozen) 1 tablespoon olive oil 1 teaspoon ground cumin 1 teaspoon chili powder Salt and pepper, to taste Toppings (optional): shredded lettuce, diced tomatoes, avocado slices, salsa, sour cream, shredded cheese, lime wedges. Instructions: Prepare the Filling: Heat olive oil in a massive skillet over medium warmth. Add diced onion and bell peppers to the skillet. Sauté until the greens are tender and barely caramelized, about five-7 mins. Stir in corn, black beans, floor cumin, chili powder, salt, and pepper. Cook for a similarly 2-3 minutes till heated through. Warm the Tortillas: In a separate skillet or directly over a gas flame, warm each tortilla for about 10-15 seconds on each side until soft and pliable. Stack the warmed tortillas and cover with a clean kitchen towel to keep them warm. Assemble the Tacos: Spoon a beneficiant amount of the vegetable filling onto each tortilla. Add desired toppings such as shredded lettuce, diced tomatoes, avocado slices, salsa, sour cream, shredded cheese, and a squeeze of lime juice. Serve and Enjoy: Serve the veg tacos immediately while warm. Customize each taco with additional toppings according to personal preference. Tips : Experiment with different vegetable fillings such as zucchini, mushrooms, or spinach. For a vegan version, omit the sour cream and cheese or use plant-based alternatives. Serve with a facet of Mexican rice, refried beans, or a sparkling salad. Whether enjoyed as a quick weeknight dinner or served at a festive gathering, these veg tacos are a delicious and versatile dish that celebrates the vibrant flavors of Mexican cuisine. Feel unfastened to get innovative and adapt the recipe on your flavor options. Enjoy your homemade veg tacos!

A Tempting Journey into Gajar Ka Halwa Delight

The irresistible Gajar Ka Halwa, a traditional Indian dessert that has been winning hearts for generations. In this blog post, we’ll embark on a delightful journey into the world of Gajar Ka Halwa, exploring its origins, sharing heartwarming stories, and, most importantly, uncovering the secrets to crafting the perfect bowl of this sweet masterpiece. Gajar ka Halwa, a beloved Indian dessert, offers more than just a sweet treat; it embodies comfort, subculture, and the warm temperature of domestic. Origin story : Gajar Ka Halwa, also known as Gajrela, is a cherished dessert deeply rooted in Indian culinary traditions. Its origins can be traced back to North India, where the winter season brings forth an abundance of sweet, red carrots. The idea of turning these vibrant carrots into a decadent dessert quickly caught on, and Gajar Ka Halwa became a staple during festive occasions and family gatherings. Gajar ka Halwa, a loved Indian dessert, gives more than only a candy deal with; it embodies comfort, tradition, and the warm temperature of domestic. With every spoonful, its wealthy aroma and creamy texture evoke cherished recollections and a feel of nostalgia. Whether loved at some point of festive events, circle of relatives gatherings, or quiet moments of indulgence, this delightful halwa brings people collectively, fostering a sense of connection and pleasure. Its combination of healthy components, like carrots, ghee, and spices, now not only satisfies the palate however additionally nourishes the soul, making it a cherished a part of Indian culinary background. Gajar ka halwa Ingredients : Let’s dive into the heart of the matter – the ingredients that make Gajar Ka Halwa an extraordinary treat. Here’s what you’ll need: Fresh, red carrots Ghee (clarified butter) Milk Khoya (reduced milk) Sugar Cardamom powder Chopped nuts (almonds, cashews, and pistachios) Raisins Cooking Method: Grate the Carrots: Start by grating the fresh carrots. The key here is to use the red variety for that natural sweetness and vibrant color. Sauté in Ghee: Heat a generous amount of ghee in a pan and sauté the grated carrots until they release their aroma. This step is crucial for enhancing the overall flavor. Simmer in Milk: Add milk to the sautéed carrots and let it simmer. This slow-cooking process allows the carrots to absorb the richness of the milk, creating a luscious, creamy texture. Sweeten the Deal: Once the carrots are tender and the milk has been absorbed, add sugar to sweeten the halwa. Adjust the sweetness according to your preference. Infuse with Flavors: Sprinkle cardamom powder for a fragrant touch, and stir in khoya to add a velvety richness. The halwa is now transforming into a heavenly concoction. Garnish and Serve: Finish by garnishing with chopped nuts and raisins. This not only adds a delightful crunch but also elevates the visual appeal of your Gajar Ka Halwa. Serving Suggestions: Whether enjoyed warm or at room temperature, Gajar Ka Halwa pairs wonderfully with a dollop of vanilla ice cream or a swirl of fresh cream. Serve it in small earthen pots for that authentic touch, or present it in elegant dessert bowls for a modern twist. Conclusion: In conclusion, Gajar Ka Halwa is not just a dessert; it’s a celebration of flavors, a testament to tradition, and a journey into the heart of Indian cuisine. So, don your apron, gather your ingredients, and immerse yourself in the joy of creating this sweet masterpiece. Your taste buds will thank you, and your kitchen will be filled with the warmth of a timeless dessert crafted with love. Gajar ka Halwa is more than just a dessert; it’s a celebration of tradition, craftsmanship, and the vibrant flavors of India. With its irresistible sweetness and comforting warmth, this beloved treat continues to enchant palates around the world, evoking nostalgia and joy with every spoonful. TO read more blog Follow us on Instagram

Healthy Besan Cheela Recipe

Besan ka cheela is a traditional Indian dish made from gram flour (besan). It’s a versatile dish that can be enjoyed for breakfast, brunch, or even as a light meal. With its crispy edges and soft, savoury centre, It is not only delicious but also nutritious, packed with proteins and other essential nutrients. In this comprehensive guide, I’ll walk you through the step-by-step process of making besan ka cheela that is both easy to prepare and bursting with flavour.  Ingredients: Before we embark on the culinary journey, let’s gather all the essential ingredients required for making a delicious besan ka cheela: 1 cup besan (gram flour) 1 small onion, finely chopped 1 small tomato, finely chopped 1 small green chilli, finely chopped (adjust quantity based on personal spice preference). 2-3 tablespoons fresh coriander leaves, finely chopped 1/2 teaspoon turmeric powder 1/2 teaspoon red chilli powder 1/2 teaspoon cumin powder Salt to taste Water, as needed Cooking oil or ghee for frying Optional Ingredients for Filling: Feel free to add any of the following ingredients : Finely chopped vegetables (bell peppers, spinach, grated carrots, etc.) Paneer (Indian cottage cheese), crumbled Grated cheese Boiled and mashed potatoes Instructions : 1. Prepare the Batter: In a mixing bowl, add besan (gram flour), turmeric powder, red chilli powder, cumin powder, and salt. Continuously whisk while gradually adding water to prevent the formation of lumps. The consistency of the batter should be smooth and pourable, similar to pancake batter. Start with about 3/4 cup of water and adjust as needed. Once the batter is smooth, let it rest for about 10-15 minutes. This allows the besan to absorb the flavours and results in a better texture. 2. Prepare the Filling (Optional): While the batter is resting, prepare the filling ingredients if you choose to include them. You can sauté the chopped vegetables in a pan with a little oil until they are slightly tender, or simply use them raw. 3. Heat the Pan: Place a non-stick frying pan or skillet on medium heat and add a little oil or ghee to grease the surface. You can also use a cooking spray if preferred. 4. Pour the Batter: Once the pan is hot, give the batter a quick stir. Pour a ladleful of batter onto the centre of the pan and spread it gently in a circular motion using the back of the ladle. The cheela should be about 6-8 inches in diameter and evenly spread. 5. Add the Filling (Optional): If you’re adding any filling ingredients, sprinkle them evenly over the surface of the cheela while it’s still wet. Press them lightly into the batter with the back of the spoon. 6. Cook the Cheela: Let the cheela cook undisturbed for 2-3 minutes on medium heat until the edges start to lift and turn golden brown. Drizzle a little oil or ghee around the edges to make them crispy. 7. Flip the Cheela: Carefully flip the cheela using a spatula once the bottom side is cooked and golden brown. Cook the other side for another 2-3 minutes until it’s evenly cooked and crispy. 8. Serve Hot: Once both sides are cooked to perfection, transfer the besan ka cheela to a plate. Duplicate the procedure with the remaining batter. Serve the hot cheelas immediately with your favourite chutney, yogurt, or ketchup on the side. Tips for Perfect Besan ka Cheela: Adjust the consistency of the batter by adding more or less water to achieve the desired thickness. Use a non-stick pan or skillet to ensure that the cheela doesn’t stick to the surface while cooking. Experiment with different fillings and spices to customize the flavour according to your taste preferences. For a healthier version, you can add grated vegetables directly to the batter instead of sautéing them separately. Serve besan ka cheela hot off the pan for the best taste and texture. Besan ka cheela is a simple yet satisfying dish that can be enjoyed by everyone. With this easy-to-follow recipe and step-by-step instructions, you can whip up delicious and flavorful cheelas in no time. Whether you’re looking for a quick breakfast option or a light meal, besan ka cheela is sure to hit the spot. So gather your ingredients, heat up the pan, and get ready to indulge in the irresistible goodness of homemade besan ka cheela! Follow us on Facebook To read more blog

Scroll to Top